Creating RESTful APIs using Go, GORM, and PostgreSQL
One of the most common uses for Go is in making backend services. This mostly includes creating RESTful APIs.
(If you are not familiar with RESTful APIs, here's an awesome video by IBM explaining it.)

In this tutorial, you will learn how to create and test a RESTful API using the Go programming language.
You can view the final project here.
 TamerlanG
Prerequisites
- You will need to know at least the basics of Go (variables, conditionals, loops, etc...)
- You will need to have Docker and Docker-Compose installed locally.
What will be making?
If you ever read any of my previous tutorials, you would know that I'm a big fan of RPG games. My favourites are Skyrim and the Dragon Age series.
So with that in mind, we will create an API that will track the available quests in our game.
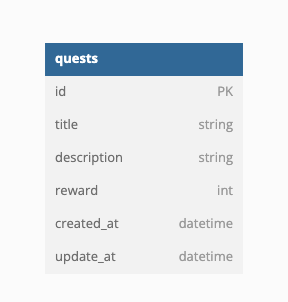
To do that, we need to have our quests saved in a database. Our database schema will look something like this:
We will create four endpoints:
- GET
/quests– will retrieve all quests in our game. - GET
/quests/{id}– will fetch a quest by its id. - POST
/quests– will create a new quest in our game. - PUT
/quests/{id}– will update a quest with the specified id. - DELETE
/quests/{id}– will delete a quest with the specified id.
Initial Setup
To start let's create a folder and initialise our go application
mkdir go-quest
cd go-quest/
go mod init github.com/your-username/go-quest
Folder Structure
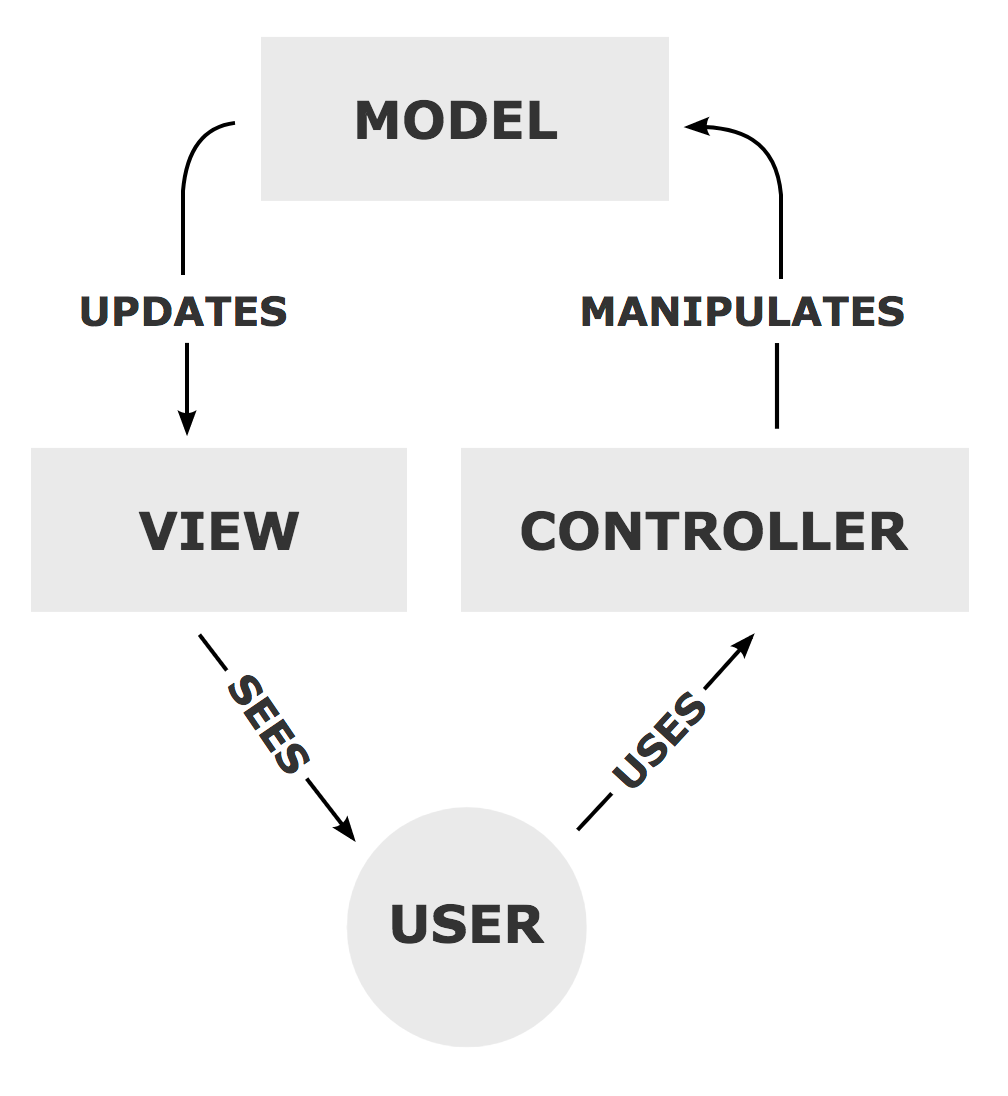
There are currently no strict standards for folder structure in Go but as I come from languages such as PHP, Python, and Java, I tend to lean more into an M0del-View-Controller (MVC) framework.
To understand this, let's take a look at the folder structure that we will have.
└── go-quest/
    ├── controllers
    ├── models
    ├── utils
    └── main.go
Let's break this down.
- Controllers – This component is responsible for handling requests from users.
- Models – The central component of the pattern. It is the application's dynamic data structure, independent of the user interface. It directly manages the data, logic and rules of the application.
- Utils – Contains helper functions that are used all over the project.
PS. The reason why we don't see a view here is that we are creating REST APIs, which do not have any visual representation. You can read more about MVC here.
 Contributors to Wikimedia projects
Creating our Models
Connecting to the Database
Before we begin with the business logic, let's first spin up an instance of Postgres and write some code that will connect to our database.
We can do that with the standard Go Postgres library, but we don't want to be writing raw SQL, so that's why we will use an object-relational-mapper (ORM) instead. The one we will use is called GORM.
To install GORM with the Postgres driver, run the following command.
go get -u gorm.io/gorm
go get -u gorm.io/driver/postgres
Once we have that installed, let's spin up a Postgres instance.
docker run --name postgres_db -p 5432:5432 -e POSTGRES_USER=postgres -e POSTGRES_PASSWORD=postgres -e POSTGRES_DB=quests -d postgres
Next inside our models folder create a file named setup.go with the following code.
package models

import (
	"fmt"
	"gorm.io/driver/postgres"
	"gorm.io/gorm"
	"os"
)

var DB *gorm.DB

func ConnectDatabase() {
	dsn := fmt.Sprintf(
		"host=%s user=%s password=%s dbname=%s port=%s sslmode=disable",
		os.Getenv("DB_HOST"),
		os.Getenv("DB_USER"),
		os.Getenv("DB_PASSWORD"),
		os.Getenv("DB_NAME"),
		os.Getenv("DB_PORT"),
	)
	database, err := gorm.Open(postgres.Open(dsn), &gorm.Config{})

	if err != nil {
		panic("Failed to connect to database")
	}


	DB = database
}
Let's analyze this code in more detail.
We first create a variable named DB with the type gorm.DB, which contains methods to communicate with our database.
Next, we have a function named ConnectDatabase, which as the name suggests connects to the database. We then have to describe the database connection by creating a Data Source Name (DSN).
The values of the DSN come from the environment variables which we will add later on. For now, the only thing you have to know is that to access an environment variable in Go, you use the method Getenv from the os package.
You can read more about DSNs here.
Contributors to Wikimedia projects
Finally, we open a database connection using the Open method from the gorm package and assign the returned value to our DB variable.
Quests Model
Now that we are connected to our database, we can comfortably create our quest model.
First, create a file named quest.go in the models folder with the following code.
package models

import "time"

type Quest struct {
  ID uint `json:"id" gorm:"primary_key"`
  Title string `json:"title"`
  Description string `json:"description"`
  Reward int `json:"reward"`
  CreatedAt time.Time `json:"created_at"`
  UpdatedAt time.Time `json:"updated_at"`
}
The only thing that we do here, is create the structure of our quest model. We also add additional metadata on how the fields are serialised in JSON format.
But this isn't the only thing we have to do, we have to tell our database that a model named Quest exists and for it to automatically create a database table for it.
We do that using the AutoMigrate method from the gorm.DB object. We add this code to the ConnectDatabase function in models/setup.go file.
func ConnectDatabase() {
	dsn := fmt.Sprintf(
		"host=%s user=%s password=%s dbname=%s port=%s sslmode=disable",
		os.Getenv("DB_HOST"),
		os.Getenv("DB_USER"),
		os.Getenv("DB_PASSWORD"),
		os.Getenv("DB_NAME"),
		os.Getenv("DB_PORT"),
	)
	database, err := gorm.Open(postgres.Open(dsn), &gorm.Config{})

	if err != nil {
		panic("Failed to connect to database")
	}


	database.AutoMigrate(&Quest{})


	DB = database
}
Creating our APIs
Defining our Routes using Mux
First, let's define our five routes. Create a file named setup.go in the controllers folder.
package controllers

import (
	"net/http"

	"github.com/gorilla/mux"
)

func New() http.Handler {
  router := mux.NewRouter()


  router.HandleFunc("/quests", GetAllQuests).Methods("GET")
  router.HandleFunc("/quest/{id}",GetQuest).Methods("GET")
  router.HandleFunc("/quest", CreateQuest).Methods("POST")
  router.HandleFunc("/quest/{id}", UpdateQuest).Methods("PUT")
  router.HandleFunc("/quest/{id}", DeleteQuest).Methods("DELETE")


  return router
}
We use a library called mux, which is an HTTP handler that makes it easy for us to create APIs.
To install it, run the following command.
go get -u github.com/gorilla/mux
Once you have that installed, then you can create a mux router using the NewRouter method and add the APIs that we will have.
You will see errors that our handler functions are not defined, but don't worry we will do that in the next section.
You can read more about mux here.
gorillaSome Useful Utility Functions
In our handler functions, there will be lots of duplicated code, such as setting the content type and responding with errors or JSON. To keep code DRY, let's create some functions that abstract all of that.
Create a file named helpers.go in the utils folder.
package utils

import (
	"encoding/json"
	"net/http"
)

func RespondWithError(w http.ResponseWriter, code int, message string) {
    respondWithJSON(w, code, map[string]string{"error": message})
}

func respondWithJSON(w http.ResponseWriter, code int, payload interface{}) {
    response, _ := json.Marshal(payload)

    w.Header().Set("Content-Type", "application/json")
    w.WriteHeader(code)
    w.Write(response)
}
The Handler Functions
We will have the handler methods for our quests in a separate file called quest.go in the controllers folder.
This file is actually a bit long, so I will break it down into multiple sections.
But before we do all that, there are some common stuff that I want to talk about first. Each function accepts a http.ResponseWriter and http.Request objects. These two objects will help us with setting the headers, parsing parameters, request bodies etc...
For example, you will see that we always want the response content type to be application/json because we are working with JSON REST APIs. We set the response content type using the following code.
w.Header().Set("Content-Type", "application/json")Getting all Quests
Getting all quests is pretty straightforward, you will simply create an array of Quests objects and find all quests using the Find method from our DB object.
func GetAllQuests(w http.ResponseWriter, r *http.Request){
  w.Header().Set("Content-Type", "application/json")

  var quests []models.Quest
  models.DB.Find(&quests)

  json.NewEncoder(w).Encode(quests)
}
Get a Single Quest
First of all, we want to get the id from the URL, we do that using the Vars method from mux that accepts a request object.
Then we simply:
- Create an empty quest object.
- Query the database to find the corresponding record.
- Fill the quest object with the properties of the record.
func GetQuest(w http.ResponseWriter, r *http.Request){
  w.Header().Set("Content-Type", "application/json")

  id := mux.Vars(r)["id"]
  var quest models.Quest

  if err := models.DB.Where("id = ?", id).First(&quest).Error; err != nil{
    utils.RespondWithError(w, http.StatusNotFound, "Quest not found")
    return
  }

  json.NewEncoder(w).Encode(quest)
}
Creating a Quest
Creating a quest is where things get a bit interesting. We have to take input and validate it. To make that easier for us we will use a package named validator.
To install validator, run the following command:
go get github.com/go-playground/validator/v10Let's break down the steps we need to take.
- Create a
QuestInputstruct with the validation rules that we need. - Take the input from the request body and validate it.
- If the input is valid, create a new quest.
var validate *validator.Validate

type QuestInput struct {
  Title string `json:"title" validate:"required"`
  Description string `json:"description" validate:"required"`
  Reward int `json:"reward" validate:"required"`
}

func CreateQuest(w http.ResponseWriter, r *http.Request){
  var input QuestInput

  body, _ := ioutil.ReadAll(r.Body)
  _ = json.Unmarshal(body, &input)

  validate = validator.New()
  err := validate.Struct(input)

  if err != nil {
    utils.RespondWithError(w, http.StatusBadRequest, "Validation Error")
    return
  }


  quest := &models.Quest{
    Title: input.Title,
    Description: input.Description,
    Reward: input.Reward,
  }

  models.DB.Create(quest)

  w.Header().Set("Content-Type", "application/json")

  json.NewEncoder(w).Encode(quest)

}
Updating a Quest
Updating a quest is similar to creating it, but instead of creating one from scratch, we find it, update its values, and save it to the database.
func UpdateQuest(w http.ResponseWriter, r *http.Request){
  w.Header().Set("Content-Type", "application/json")

  id := mux.Vars(r)["id"]
  var quest models.Quest

  if err := models.DB.Where("id = ?", id).First(&quest).Error; err != nil{
    utils.RespondWithError(w, http.StatusNotFound, "Quest not found")
    return
  }

  var input QuestInput

  body, _ := ioutil.ReadAll(r.Body)
  _ = json.Unmarshal(body, &input)

  validate = validator.New()
  err := validate.Struct(input)

  if err != nil {
    utils.RespondWithError(w, http.StatusBadRequest, "Validation Error")
    return
  }

  quest.Title = input.Title
  quest.Description = input.Description
  quest.Reward = input.Reward

  models.DB.Save(&quest)

  json.NewEncoder(w).Encode(quest)
}
Deleting a Quest
Deleting a quest is simply finding the quest with the corresponding ID and removing it from the database by the Delete method.
func DeleteQuest(w http.ResponseWriter, r *http.Request){
  w.Header().Set("Content-Type", "application/json")

  id := mux.Vars(r)["id"]
  var quest models.Quest

  if err := models.DB.Where("id = ?", id).First(&quest).Error; err != nil{
    utils.RespondWithError(w, http.StatusNotFound, "Quest not found")
    return
  }

  models.DB.Delete(&quest)

  w.WriteHeader(http.StatusNoContent)
  json.NewEncoder(w).Encode(quest)
}
Putting it all Together
Now that we got our models and controllers set up, let's put them together.
In your root directory, create a file named main.go
package main

import (
	"log"
	"net/http"

	"github.com/joho/godotenv"
	"github.com/tamerlang/go-quest/controllers"
	"github.com/tamerlang/go-quest/models"
)


func main() {
  godotenv.Load()

  handler := controllers.New()

  server := &http.Server{
		Addr:    "0.0.0.0:8008",
		Handler: handler,
  }

  models.ConnectDatabase()

  server.ListenAndServe()
}
As you may have noticed, we used a new package called godotenv. This package basically loads the .env file to our go environment.
You can install godotenv using the following command.
go get github.com/go-playground/validator/v10Make sure you have Postgres running. You can use this command to spin up a Postgres docker instance.
docker run --name postgres_db -p 5432:5432 -e POSTGRES_USER=postgres -e POSTGRES_PASSWORD=postgres -e POSTGRES_DB=quests -d postgres
If you run this command, then your .env file should look something like this.
DB_HOST=localhost
DB_USER=postgres
DB_PASSWORD=postgres
DB_NAME=quests
DB_PORT=5432
You should have everything set up.
To run the server, just run the following command.
go run main.goConclusion
Today you learned:
- How to create RESTful APIs using Go.
- How to connect to a database in Go.
- How to manipulate our database tables using GORM.
- How to handle HTTP requests in Go.
Now you can finally brag to your friends that you're an expert in Go.
Just kidding, there's a lot more to it than that.
If you like this article and you wanna read more, feel free to check out the rest of my blog.
Thanks for reading.
PS. I was so lazy writing this article that I'm sure you could refactor the code and make it better. I apologize in advance for this.
No spam, no sharing to third party. Only you and me.
Member discussion