Django caching using Redis

Cacheing is one of those things that are simple at first but can get really messy quick.
There's even a quote about it.
There are only two hard things in Computer Science: cache invalidation and naming things – Phil Karlton
The story goes like this.
- You start off with one cache and get that sweet performance boost.
- You then decide to cache lots of things.
- This is where things go wrong. Your front-end developers are complaining that they are getting the wrong data.
- You're forced to debug on why your cache did not invalidate the wrong data.
It's a mess. It's a pain.
That's why I'm here to teach you the dos and don'ts of caching. The one-stop-shop for all cache with Django and Redis.
Today we will cover:
- The theory behind caching and why it's so damn hard to get well.
- A basic introduction to my favourite cache service Redis.
- How to integrate Redis with my second favourite web framework Django.
- Best practices on using Redis and caching in general.
PS. The code for this project can be found here:
What is Caching?

Let's imagine a book site that has a single database.
You go to the homepage and it will return for you the 10 most popular books on the platform. In the beginning the site loads quickly but over time as more and more books get added, it's starting to get longer and longer to compute the 10 most popular books.
You start to wonder, why the hell is the site slow?
As a developer of the site, you go and check the code. The SQL query to get all popular books looks something like this:
SELECT name from BOOKS ORDER BY popularity LIMIT 10Let's imagine that this is a super heavy SQL query and we can't optimize it anymore. How would we speed up our site?
You figured out that the top 10 books doesn't get updated frequently and you can simply cache it for a month.
But what does cache here mean?
Let me explain.
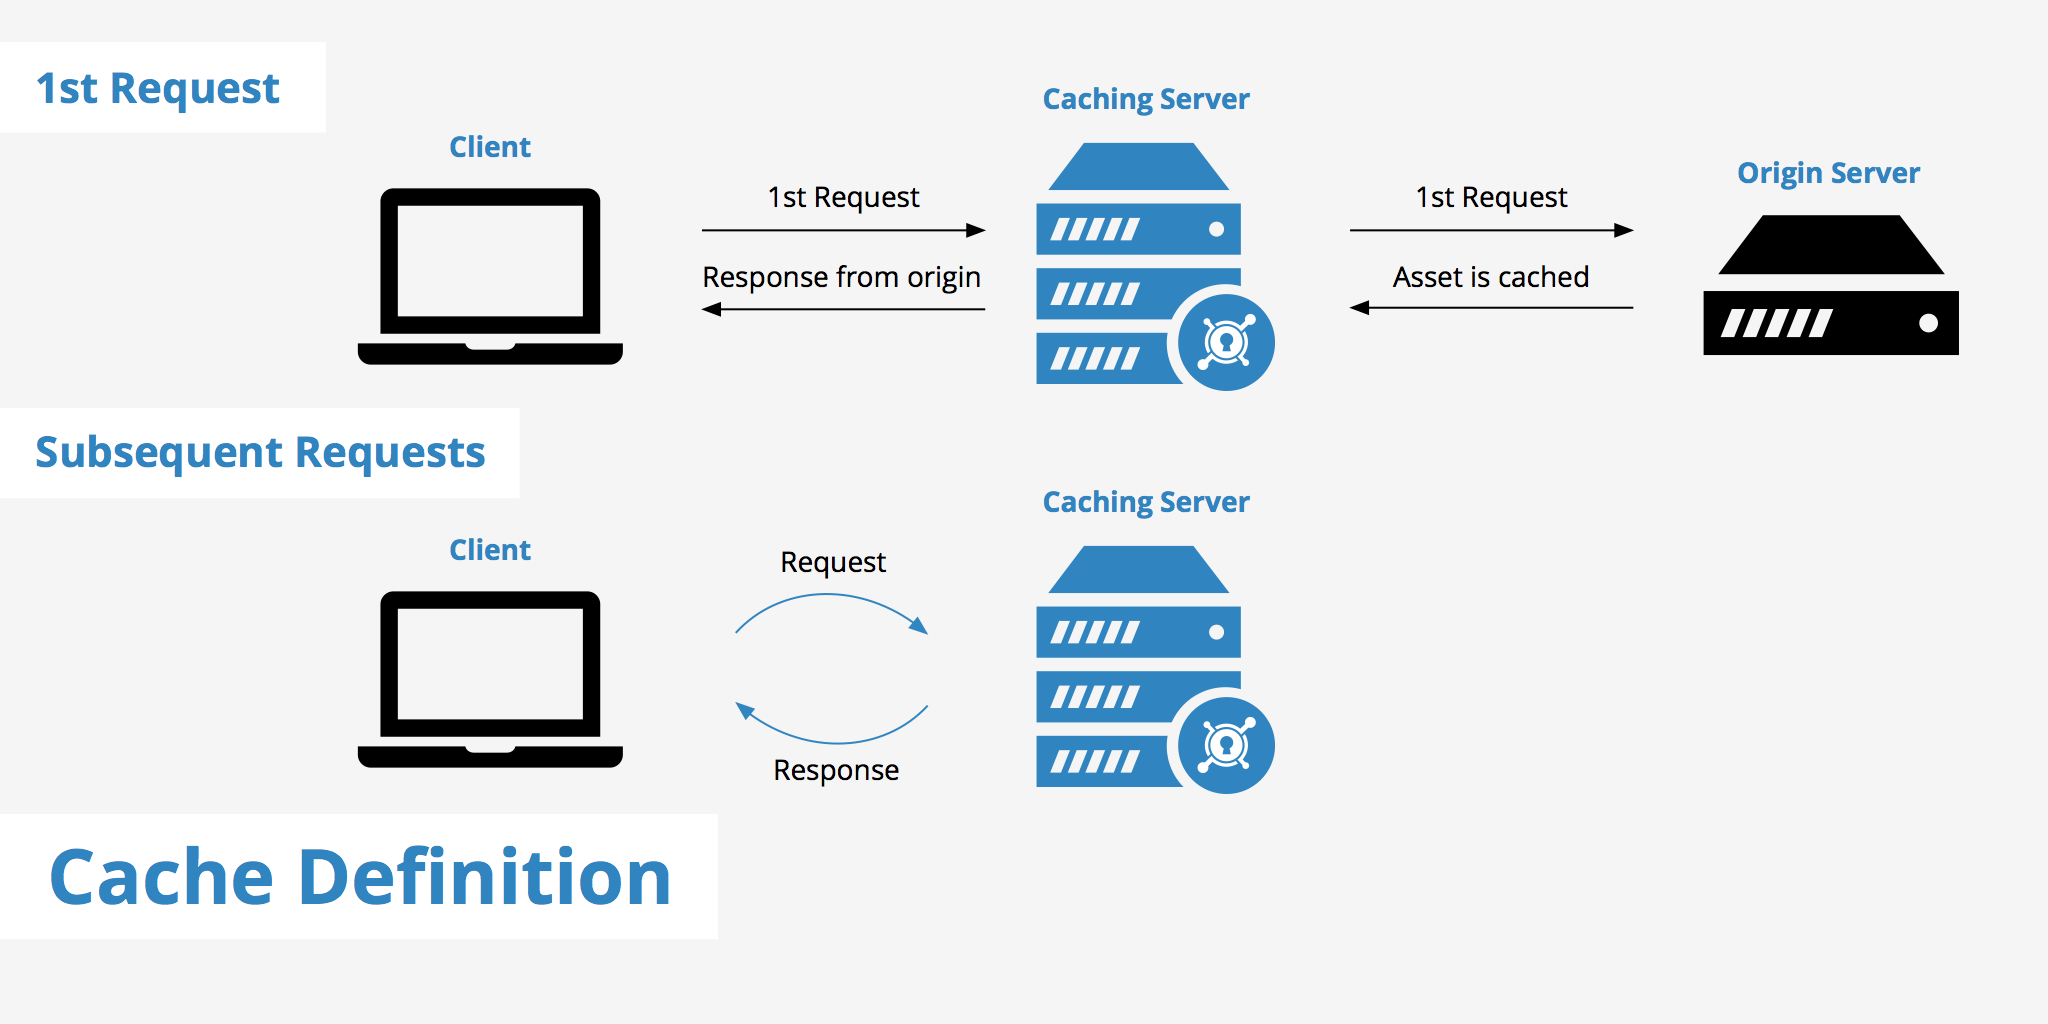
When we run our SQL query, it takes data directly from the disk. In our server, this might be a hard drive or a solid-state drive (SSD). Taking data from the disk is expensive and slow. A much faster way would be to take data from random access memory (RAM). Cacheing is the process of storing data in RAM to be served up much faster than fetching it from the disk.
Now that we know what caching is, how would we fix our site?
Well, you would simply save the result of the query to the cache with an expiry date of 1 month and if a user requests the top 10 books we would directly access the data from the cache instead of calling the SQL query. This is much faster, statistics say can be up to 20x faster.

The code will look something like this:
def get_top_books():
	if cache.get("top_books") is not None:
    	return cache.get("top_books")

    top_books = get_top_books_from_database()
    cache.save("top_books", top_books, timelimt="1 month")

    return top_books
You might ask why did we add the time limit?
Well, it's because official book charts get updated on a monthly basis and top books might change every month. At that time we want our cache to expire and to get a new list of top books to cache.
After adjustments, our site is fast again. After this experience, you decide to cache everything and this is where the problems start. Your customers start to complain that they are getting old data and the site is slowing down due to useless caches.
Yea, this happens. Caches are great but it's easy to mess up.
Let's look at this in more depth as to why caching is hard.
Why is Caching Hard?

The difficulties in caching are not technical per se, it's more behavioural. For example for caches to work well you need two things:
- Data that you want to cache
- Time to cache
These two things can be pretty difficult to predict and costly. If you chose the wrong data to cache then your cache is useless because no one queries it. On the other hand, if the cache is too short then it's useless and if it's long then this might cause memory leaking.
I think it all comes down to prediction. It's simply hard to predict data. You don't know if some data will be changed by some other process and boom your cache is now invalid.
Another thing is that we programmers try to imagine the world as perfect. Unfortunately, real life is the complete opposite, so it's safe to assume that cache misses are almost guaranteed at some point.
Finally, if you get some sort of bug related to cache misses, then it's a pain to debug. Cache bugs are hard to reproduce and need intensive testing from both developers and QA engineers.
Now that we know what a cache is and why is it hard to maintain.
Let's integrate it with a Django project.
Prerequisites
- Python3
- NPM
- Docker and Docker-Compose
- Basic knowledge of Python, Django and Containers.
Setting up our Project
Let's set up our Python environment and install Django:
mkdir django-redis-demo
cd django-redis-demo
python3 -m venv venv
source venv/bin/activate

pip install django
Once we have that done, let's initialize our project named core and app named "app":
django-admin startproject core .
python manage.py startapp app
Basic Models
We need models to play around with so create a model with a name field in our app models file:
# app/models.py

from django.db import models

class SampleModel(models.Model):
    title = models.CharField(max_length=200)

    def __str__(self) -> str:
        return self.title
Don't forget to add our app to "installed_apps" in settings.
# core/settings.py

INSTALLED_APPS = [
    # default django apps...

    'app'
]
Once you have that done, let's run our migrations.
python manage.py makemigrations
python manage.py migrate
If we run the server, we should see that everything is working fine.
python manage.py runserverDockerizing our Project
If you have Redis already installed locally and you want to use that, feel free to skip this whole step.
If you don't have Redis installed or don't want to install it locally like me. Then the next best thing would be to create a container of it.
To begin, let's dockerize our Django app.
Create a Dockerfile in project root with the following:
# Dockerfile
FROM python:3
ENV PYTHONUNBUFFERED=1
WORKDIR /usr/src/app
COPY requirements.txt ./
RUN pip install -r requirements.txt
This simply creates a python container with our project and installs all the needed dependencies.
Next, create a docker-compose.yml file in project root with the following:
version: "3.8"

services:
    django:
        build: .
        container_name: django
        command: python manage.py runserver 0.0.0.0:8000
        volumes:
            - .:/usr/src/app/
        ports:
            - "8000:8000"
        depends_on:
            - redis
    redis:
        image: "redis:alpine"
Basically, we have two services:
- One service is for docker which runs on localhost:8000
- One service for Redis that runs by default on port 6379
Finally, run your service with the command:
docker-compose up If you don't see any errors then everything worked.
Let's go and create a basic API that returns for us all sample models.
Views
In our views for our app folder add the following function:
# app/views.py
from django.http import JsonResponse
from django.core import serializers

from app.models import SampleModel

def sample(request):
    objs = SampleModel.objects.all()
    json = serializers.serialize('json', objs)
    return JsonResponse(json, safe=False)
This is a pretty simple function that simply returns all sample models.
Let's add it to our URLs
In our core/urls.py add the following:
# app/views.py

from django.contrib import admin
from app.views import sample

urlpatterns = [
    path('admin/', admin.site.urls),
    path('sample', sample),
]
If we go to localhost:8000/sample we should see an empty array.
Right now this view gets all of our sample models from our database. Everytime we request this route it will make a request to the database.
Let's make another route that utilizes cache.
Integrating Redis with Django
The great thing about Django is it's integrations.
You can literally hook up Redis using one line of code and then use the Django cache package which abstracts the complexity that cache engines bring.
Anyways to begin working with Redis in Django we must first install a package called django-redis.
pip install django-redisDon't forget to recreate requirements.txt and rebuild the docker containers.
pip freeze > requirements.txt
docker-compose build --no-cache
Once you have that installed and up running, we should add cache configs to our setting to point to Redis.
# core/settings.py

# other settings....

CACHES = {
        "default": {
            "BACKEND": "django_redis.cache.RedisCache",
            "LOCATION": "redis://redis:6379/",
            "OPTIONS": {
                "CLIENT_CLASS": "django_redis.client.DefaultClient"
            },
        }
    }
Here we are basically saying that we want to use a cache and our service will be Redis. The reason why we installed django-redis is because it will act as a client that will abstract the communication we have with redis.
You might also notice that the location is pretty weird?
This is because Redis utelizes it's own protocol called redis, you can think of it like HTTP but for redis and named differently. The other thing is that our Redis service is located at redis:6379. Why not localhost? This is because communication between two docker-compose containers should be by their service name. Because our Redis service in docker-compose is called redis, then the host name should be redis instead of localhost or 127.0.0.1.
We are done, this is the all the configuration we need. I wasn't lying when I said it's this simple. The beauty with this approach is that if we want to change the service in the future to let's say Memcached, then we simply have to only change the configurations. Instead of using a Redis client we would use a Memcached client.
Cached View
Now that we have our cache setup, lets use it.
Let's add a cached view to our app/views.py:
# app/views.py

# other code.....

from django.core.cache import cache
from django.conf import settings
from django.core.cache.backends.base import DEFAULT_TIMEOUT

CACHE_TTL = getattr(settings, 'CACHE_TTL', DEFAULT_TIMEOUT)

def cached_sample(request):
    if 'sample' in cache:
        json = cache.get('sample')
        return JsonResponse(json, safe=False)
    else:
        objs = SampleModel.objects.all()
        json = serializers.serialize('json', objs)
        # store data in cache
        cache.set('sample', json, timeout=CACHE_TTL)
        return JsonResponse(json, safe=False)
Let's break this function down.
We first set a Cache Time to Live variable, which basically means how long do we want the cache to stay valid. We can customize it by changing the variable CACHE_TTL in our django settings or it will default to 300 seconds which is 5 minutes.
The actual view is pretty simple, we check if a variable named sample exists in cache, if it does return it. If not then get the data from the database and cache it.
Don't forget to add this view to our urls.
# core/urls.py

from django.contrib import admin
from app.views import sample, cached_sample

urlpatterns = [
    path('admin/', admin.site.urls),
    path('sample', sample),
    path('cache', cached_sample),
]
Testing
So far our views are both working, but you won't notice much of a difference.
To test these APIs we have to conduct a load test. I will be using a npm package called loadtest.
You can install loadtest globally using this command:
sudo npm install -g loadtest
Once that is done, let's test our non-cached API. Run the command:
loadtest -n 100 -k http://localhost:8000/sampleThis should bring up a bunch of results, but the one we care about is:
INFO Requests per second: 34This means our API can handle only 34 requests per second.
Let's test the cached API.
loadtest -n 100 -k http://localhost:8000/cacheThe result is:
Requests per second: 55The result is much better, almost double the amount of requests. To put this into context, our cached API is 60% faster.
Congratulations, you got your first taste of the caching world. But it doesn't end here. Let's cover some best practices you will need in your journey.
Best Practices
There are many best practices covered in the internet and there is no one guideline. Personlly most of these are my opinion so take them with a grain of salt.
Cache Carefully
This is a pretty hard one to do because its just hard to predict how much your data will be used. My general consensus is to be very picky on what to cache, because caching one wrong thing will open an array of other problems.
Another thing is to ALWAYS test before optimizing. This is not only for caching but for any sort of optimization. Applications usually follow the 80/20 rule, where 80% of the load is in 20% of the code. So if you can optimize the 20% you would get a substantial improvement. The other reason why this is good is to justify your time to do this to your managers or peers. It looks good on your resume too.
I've increased the performance of the program by 300% – Some Random Resume
Work at the Appropriate Level
This is not also directly related to cache but more optimization thing. It's almost always better to do things in the lower level than in the higher. For example, instead sorting database records using the python len method, it would be much faster doing it in SQL. Coming back to cacheing, there are some people who are simply and cache a whole HTTP request, sometimes it's better to go a little lower and cache a database query result or some other heavy function.
Naming Keys
There isn't much of a best practice here but I like to use this template: class_name_function_name_extra_params_objectid. In general it doesn't matter as long as it's readble and unique, we don't want to store two variables with the same key.
Testing
Caches introduce a whole lot of complexity and should be tested in an production like environment. It's not enough to test locally in your dev or qa environments. This should be a joint effort between the developers and QA.
There are many different tools to do these:
- ApacheBench – is a single-threaded command line computer program for measuring the performance of HTTP web servers.
- Locust – An open source load testing tool that allows you to write Python code to automatically load test.
- Apache JMeter - is an project that can be used as a load testing tool for analyzing and measuring the performance of a variety of services, with a focus on web applications
- New Relic – It's a platform that allows you to monitor, debug, and improve your entire stack. It has support to many different technologies and programming languages.
Conclusion
Whew, that was long. Glad you made it.
I usually don't know what to say in conclusions, but figured out giving next-step resources would be the go-to thing.
I would suggest watching tech talks or reading articles about advanced caching or low-level cache things.
Anyways, I hope you enjoyed today's article and if you like feel free to share it with your colleagues.
Thanks for Reading!
Recommanded Resources:


No spam, no sharing to third party. Only you and me.


Member discussion