How to build a GraphQL API using Python and Django
As API developers it's easy for us to fall into the trap of routine. I'm not saying it's a bad thing but it gets boring real quick.
To break through this routine it's up to us to do interesting and new things.
One of these things is trying an alternative to REST APIs.
GraphQL.
I'm not trying to advocate for it here. I'm just a curious person just like you reader.
Why was it created and how do we implement it?
Thankfully I answered the first question in my article on the history of GraphQL. You can check it out here.
 Tamerlan Gudabayev
This article will cover the second question on how to implement it, specifically using Python and Django.
So prepare your terminals, IDEs or whatever you need to code.
Let's create GraphQL APIs.
PS. I already did a similar article for PHP and Laravel. You can check it out below.
 Tamerlan Gudabayev
You can find the final project on GitHub here.
 TamerlanG
Prerequisites
- Basic knowledge Python
- Basic knowledge of Django (models, views, routing, etc...)
What are we going to build?
I like RPG games like Skyrim and Dragon Age.
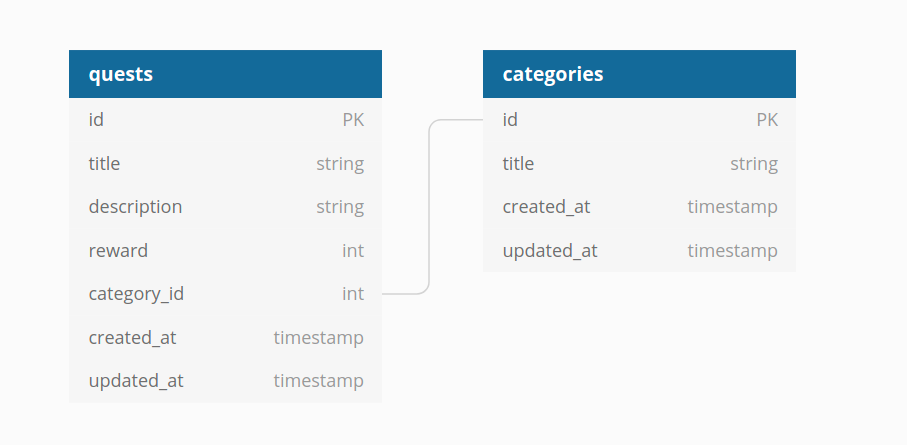
So with that in mind, we will build an API to fetch and create quests with their appropriate category.
The database model will look like the image above.
Setting Up Our Project
In an empty folder, initialize a virtual environment for python.
python3 -m venv venvThis should create a virtual environment in a folder called venv. Next, let us active the virtual environment using the following command:
source venv/bin/activateOnce the virtual environment is activated, let's install Django, specifically version 3.2. The reason why we do that is because the library that we use to implement GraphQL doesn't support the latest version of Django 4.0
If in the future this issue get's resolved, you can first know it here:
graphql-pythonTo install Django, run the following command:
pip install django==3.2After that let's initialize our project and create our first app.
django-admin startproject rpg .
python manage.py startapp quest
Now you should be able to run our server using:
python manage.py runserverCreating our Models
Let's create our Quest and Category models.
# quest/models.py

from django.db import models
from django.utils import timezone


class Category(models.Model):
    title = models.CharField(max_length=150)


class Quest(models.Model):
    title = models.CharField(max_length=150)
    description = models.TextField()
    category = models.ForeignKey(Category, related_name='category', on_delete=models.CASCADE)
    created_at = models.DateField(default=timezone.now, editable=False)
These are the only two models we need.
Let's generate and run our migrations.
python manage.py makemigrations
python manage.py migrate
Installing Graphene
The library that we will use to implement GraphQL is graphene. We will use the sibling library graphene-django because it has direct support for Django.
Install graphene-django using the following command:
pip install graphene-django
One more thing, we will also enable filtering in our GraphQL APIs. To make this functionality work we will need to install django-filter.
pip install django-filterLet's update our installed apps in settings.py:
# rpg/settings.py

INSTALLED_APPS = [
    'django.contrib.admin',
    'django.contrib.auth',
    'django.contrib.contenttypes',
    'django.contrib.sessions',
    'django.contrib.messages',
    'django.contrib.staticfiles',

    # Third Party
    'graphene_django',

    # Apps
    'quest',

]
Unlike REST, GraphQL has a single endpoint that our client will communicate with. By default a route to /graphql will suffice.
For debugging purposes, we will enable graphiql which is an interactive API browser for GraphQL.
You can read more about it here:
graphql# rpg/urls.py
from django.conf.urls import url
from django.contrib import admin
from django.urls import path
from graphene_django.views import GraphQLView
urlpatterns = [
path('admin/', admin.site.urls),
url(r"graphql", GraphQLView.as_view(graphiql=True)),
]Right now this will not work and throw an error because we don't have any schema attached.
Before we work on that, let's talk about file structuring.
File Structure
A GraphQL schema has three components:
- Object Types – This is the most basic component, which just represent a kind of object you can fetch from your service, and what fields it has. For example, in our project, we will have a
CategoryTypeandQuestType. - Queries – A GraphQL operation that fetches data.
- Mutations – A GraphQL operation that creates or updates data.
For small projects all three can be in one file called schema.pybut for anything bigger, it's better to have them separated.
The file structure will look like this:
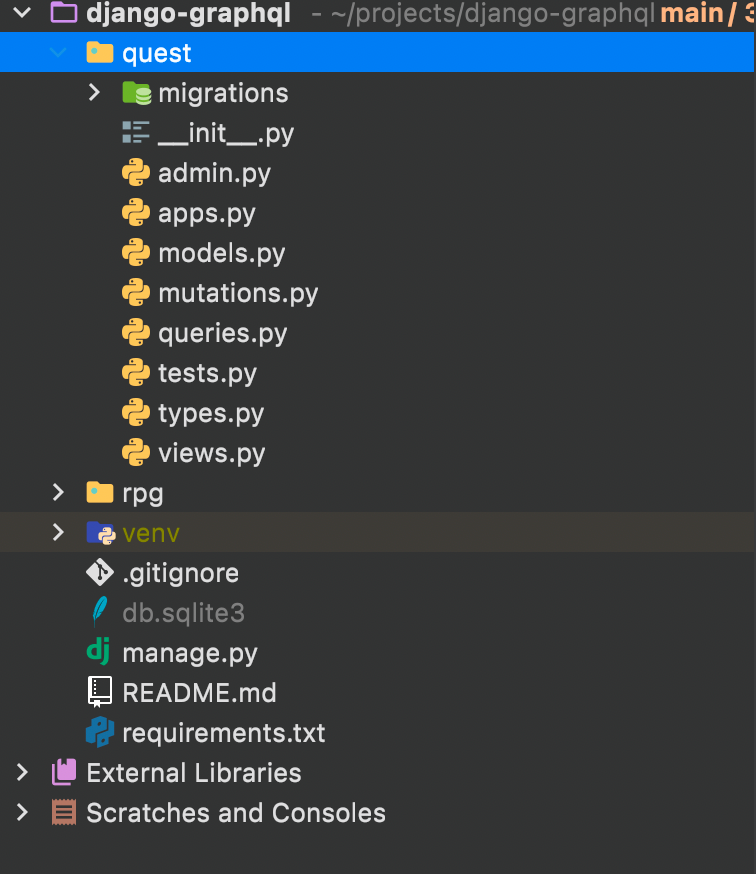
Creating our API
Types
The first thing we need to do is to define our object types. We only want to fetch our categories and quests hence we will create objects for each of them.
Add this code to types.py:
# quest/types.py

from graphene import relay
from graphene_django import DjangoObjectType

from quest.models import Category, Quest


class CategoryType(DjangoObjectType):
    class Meta:
        model = Category
        filter_fields = ['title', ]
        interfaces = (relay.Node,)


class QuestType(DjangoObjectType):
    class Meta:
        model = Quest
        filter_fields = {
            'title': ['exact', 'icontains', 'istartswith'],
            'description': ['exact', 'icontains'],
            'category': ['exact'],
            'category__title': ['exact'],
        }
        interfaces = (relay.Node,)
Graphene-Django provides us classes to easily integrate our models into GraphQL object types. We use the class DjangoObjectType to translate our model into a GraphQL object type.
We also define filters, this mechanism is provided by django-filter. It has a lot of different parameters, you can read more about it here:
Queries
Queries are the easiest part. They are abstracted away by graphene_django.
The way it works is that graphene_django uses a library called relay to easily integrate with python.
There are two types of queries that we will create:
- Query to fetch a single element
- Query to fetch a list of elements
To fetch a single element, we will simply use relay node field which will take in our object type. On the other hand, to fetch a list of elements, we will use the helper function DjangoFilterConnectionField to automatically create a query to list and filter elements.
We will do this twice because we have two object types.
Paste this code, into queries.py
# quest/queries.py

from graphene import ObjectType, relay
from graphene_django.filter import DjangoFilterConnectionField

from quest.types import CategoryType, QuestType


class Query(ObjectType):
    category = relay.Node.Field(CategoryType)
    all_categories = DjangoFilterConnectionField(CategoryType)

    quest = relay.Node.Field(QuestType)
    all_quests = DjangoFilterConnectionField(QuestType)
Now that we know how to fetch data, let's look at how to create and update them.
Mutations
For each of our operations, we create a separate mutation class. So because we want to be able to create and update our models.
We will need three types of classes:
- Mutation class that is used to create/update models.
- Input Object Type class for any complex inputs.
- Finally, an object type class to export our mutations classes.
Let's first start with the mutation classes.
# quest/mutations.py

import graphene
from graphene import Mutation

from quest.models import Category, Quest
from quest.types import CategoryType, QuestType


class UpdateCategory(Mutation):
    class Arguments:
        title = graphene.String(required=True)
        id = graphene.ID()

    category = graphene.Field(CategoryType)

    @classmethod
    def mutate(cls, root, info, title, id):
        category = Category.objects.get(pk=id)
        category.title = title
        category.save()

        return UpdateCategory(category=category)


class CreateCategory(Mutation):
    class Arguments:
        title = graphene.String(required=True)

    category = graphene.Field(CategoryType)

    @classmethod
    def mutate(cls, root, info, title):
        category = Category()
        category.title = title
        category.save()

        return CreateCategory(category=category)
Essentially for every operation, we create a separate class that inherits the Mutation class from graphene_django.
Using this class you can configure the arguments that your model needs and you may notice that in both of our classes we have:
category = graphene.Field(CategoryType)This is field is used as an output response. Meaning that once our operation is successful we will return to a field called category which corresponds to CategoryType.
The real magic happens in the mutate method. This is where we take in the arguments in the method parameter and we simply create a normal Django object model.
Finally, we return the class with the corresponding category.
Let's do the same for our quest model.
# quest/mutations.py

class QuestInput(graphene.InputObjectType):
    title = graphene.String()
    description = graphene.String()
    category = graphene.Int()


class CreateQuest(graphene.Mutation):
    class Arguments:
        input = QuestInput(required=True)

    quest = graphene.Field(QuestType)

    @classmethod
    def mutate(cls, root, info, input):
        quest = Quest()
        quest.title = input.title
        quest.description = input.description
        quest.category_id = input.category
        quest.save()

        return CreateQuest(quest=quest)


class UpdateQuest(graphene.Mutation):
    class Arguments:
        input = QuestInput(required=True)
        id = graphene.ID()

    quest = graphene.Field(QuestType)

    @classmethod
    def mutate(cls, root, info, input, id):
        quest = Quest.objects.get(pk=id)
        quest.title = input.title
        quest.description = input.description
        quest.category_id = input.category
        quest.save()
        return UpdateQuest(quest=quest)
This one is slightly different because we don't want to have lots of arguments like:
def mutate(cls, root, info, title, description, category_id):
	# some code
We can simply abstract this complexity into an input object class. Using the input object class we have:
def mutate(cls, root, info, input):
	# some code
To finish it all up, our mutations would be fields in GraphQL and we need a place to get them all.
# quest/mutations.py

class Mutation(graphene.ObjectType):
    update_category = UpdateCategory.Field()
    create_category = CreateCategory.Field()
    update_quest = UpdateQuest.Field()
    create_quest = CreateQuest.Field()
Putting it all together
You may have noticed that we still have the error that schema is not found.
To fix that create a schema.py file in our root app.
# rpg/schema.py

import graphene

import quest.queries
import quest.mutations


class Query(quest.queries.Query, graphene.ObjectType):
    # This class will inherit from multiple Queries
    # as we begin to add more apps to our project
    pass


class Mutation(quest.mutations.Mutation, graphene.ObjectType):
    pass


schema = graphene.Schema(query=Query, mutation=Mutation)
This is the root schema class where we will add all our queries and mutations. If you have other query classes in other apps. You can add them by extending the corresponding class. For example:
class Query(QueryClass1, QueryClass2, etc..., graphene.ObjectType):
	pass
Same thing for mutations.
The only problem now is that graphene does not the existence of our schema. Let's add that to our graphene configs in settings.py.
# rpg/settings.py
GRAPHENE = {
'SCHEMA': 'rpg.schema.schema'
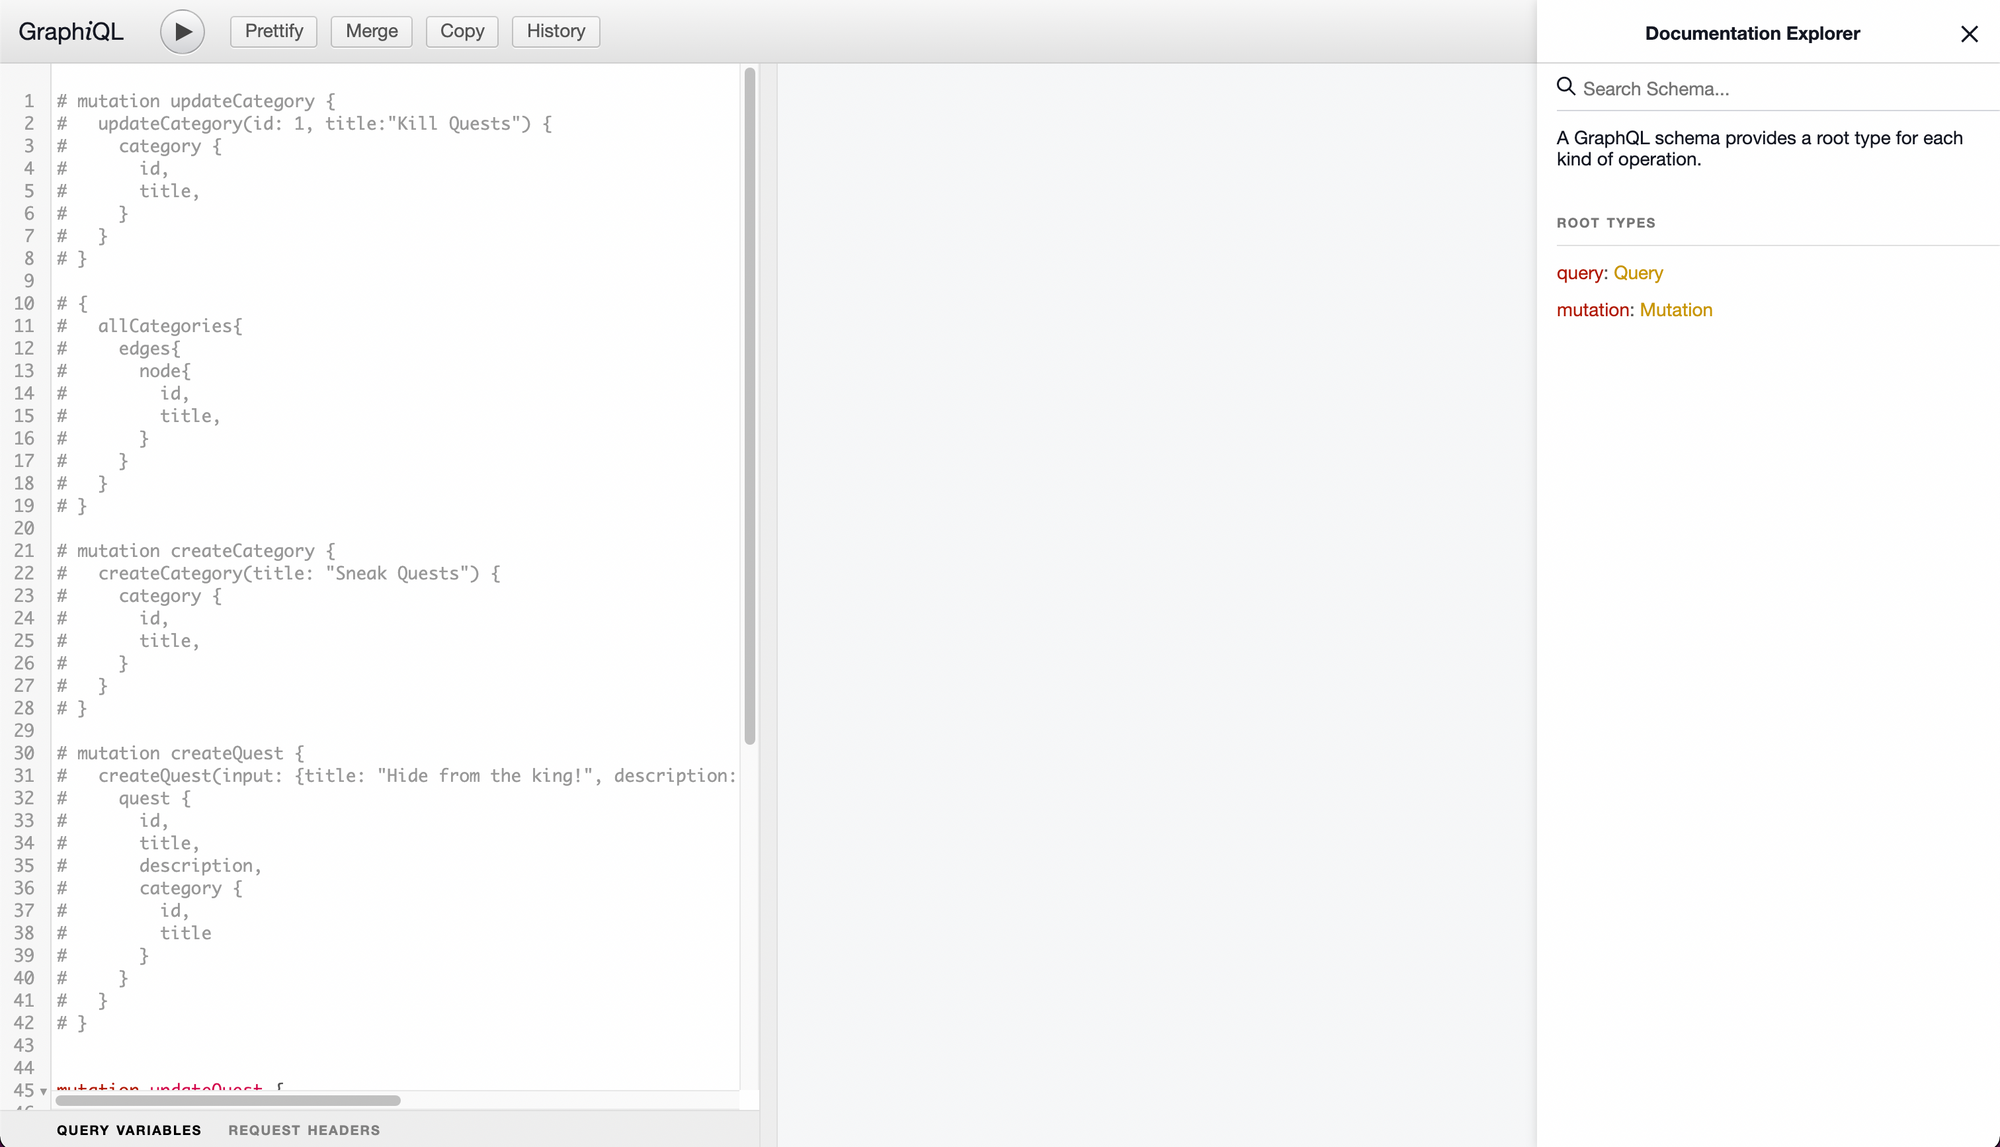
}If you reload your server and go to route /graphql, you should see something like this:
Conclusion
Congratulations if you have made it this far and got yourself a working set of APIs.
We covered a lot today. From creating our APIs to testing them.
But what's next?
Thanks for asking, if you want to develop your skills further you can read up on best practices.
You can check out more resources here:
chentsulinThanks for reading!
No spam, no sharing to third party. Only you and me.
Member discussion