Load Balancing in Kubernetes: A Step-by-Step Guide

Load balancing is the process of distributing network traffic equally over a set of resources that support an application.
Modern applications must process millions of users simultaneously and return the correct data in a fast and reliable way.
To do that we distribute the network traffic equally which will result in better availability, scalability, security, and performance for the application.
But how do we implement load balancing?
In non-container environments, load balancing is pretty straightforward.
But, nowadays, many applications are run on containers using technologies such as Docker and are orchestrated using Kubernetes.
Kubernetes offers several options for load balancing, depending on the type of application and the requirements of the workload.
Knowing the difference between each and its implementation will help you better decide what to use.
Today we will cover:
- Overview of load balancing in Kubernetes.
- Overview of ClusterIP service.
- Overview of NodePort service.
- Overview of Load Balancer service.
- Overview of Ingress service.
Load Balancing in Kubernetes
In general, there are two types of load balancing that Kubernetes provide.
- Internal – Internal load balancing refers to load-balancing traffic within a Kubernetes cluster. Internal load balancing is fairly simple and is handled by the ClusterIP service.
- External – External load balancing is used to expose our services outside our cluster. Kubernetes provides three types of external load balancing: NodePort, LoadBalancer, and Ingress.
PS. To run all the examples below, make sure to have Kubernetes running locally using either Docker Desktop or MiniKube. Just make sure you can run commands using kubectl.
Cluster IP
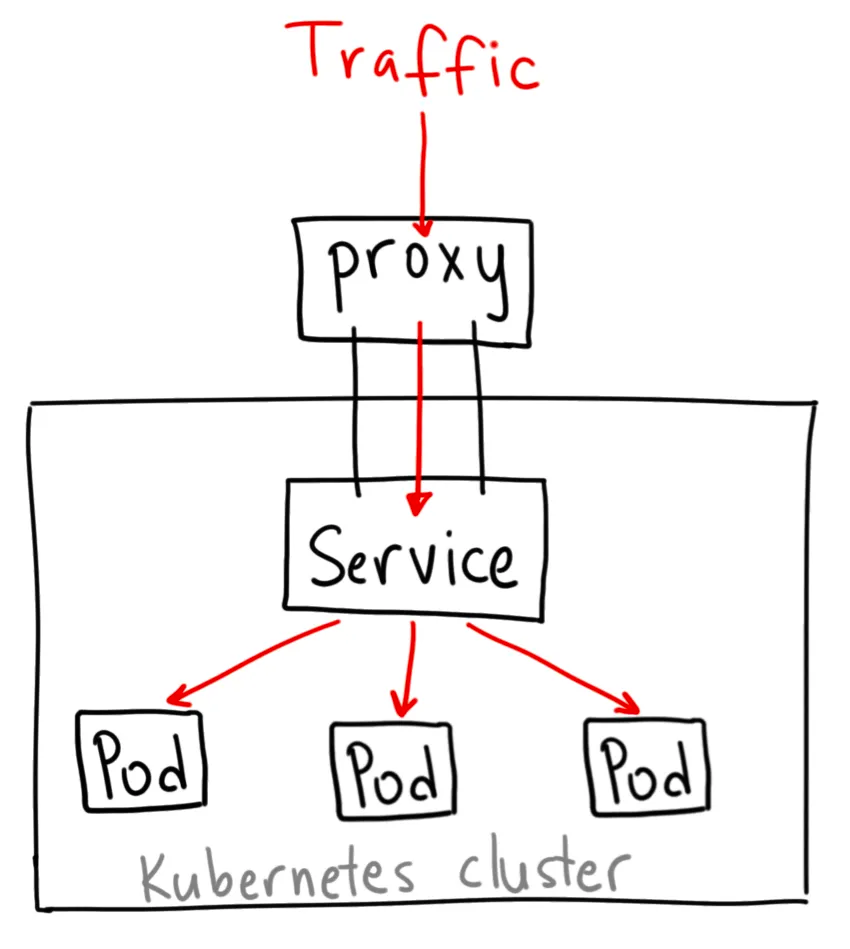
ClusterIP service is the default Kubernetes service.
It provides a stable IP address that maps to one or more pods.
This allows other services within the cluster to access those pods using a consistent IP address.
Normally you can't access the ClusterIP service from the internet, but you can bypass that rule by exposing a proxy service using Kubernetes proxy.
Now that we know the theory, let's implement it.
Create a file named cluster-ip-demo.yaml with the following:
apiVersion: v1
kind: Service
metadata:
  name: backend
spec:
  type: ClusterIP
  ports:
    - protocol: TCP
      targetPort: 80
      port: 80
This will be our service. Currently, it's not bound to anything so let's create a sample pod.
Create a file named pod-demo.yaml with the following:
apiVersion: v1
kind: Pod
metadata:
  name: demo-pod
  labels:
    app: demo-pod
    type: frontend-app
spec:
  containers:
  - name: nginx-container
    image: nginx
Now we can update our cluster-demo.yaml file to map our pods by their labels to the ClusterIP service.
apiVersion: v1
kind: Service
metadata:
  name: Backend
spec:
  type: ClusterIP
  ports:
    - targerPort: 80
      port: 80
  selector:
      name: demo-pod
      type: frontend-app
Now that we have configured the YAML files, we have to:
- Create and run our pods.
- Create and run our ClusterIP service.
To run the pod, use the following command:
kubectl apply -f pod-demo.yamlNext, let's create our service. Run the following command:
kubectl create -f cluster-ip-demo.yamlNow that the pods are running inside our cluster, we will expose it to external traffic using Kubernetes proxy.
Start the Kubernetes proxy using the following command:
kubernetes proxy --port=8080When should you use this?
ClusterIP provides us with simple load balancing out of the box but it's only limited to internal traffic.
Which is good if that's what you're looking for.
Because it's only internal means it's secure.
But you would only want to expose this using Kubernetes proxy in two scenarios:
- Debugging purposes.
- Allowing internal organization traffic for monitoring, internal dashboard, etc...
Node Port

We will now start talking about handling external traffic.
The first service we will talk about is NodePort.
NodePort is an extension of ClusterIP and provides the same functionality, but also exposes the service on a static port (ranges from 30000 to 32767) on each node in the cluster. This allows the service to be accessed externally from outside the cluster, as well as from within the cluster.
Let's create a sample NodePort service.
Create a file named node-port-demo.yaml with the following:
apiVersion: v1
kind: Service
metadata:
  name: my-nodeport-service
spec:
  selector:
      name: demo-pod
      type: frontend-app
  type: NodePort
  ports:
  - name: http
    port: 80
    targetPort: 80
    nodePort: 30036
    protocol: TCP
Huh, it seems pretty similar to our ClusterIP service.
The difference is that we specify the kind of service as NodePort and add a field named nodePort.
This field specifies which port to open on the nodes. If you don't specify this port, Kubernetes will choose the port for you. It is usually better to let Kubernetes choose the port for you because there are many caveats as to what ports are available to use.
Where would you use this?
NodePort is useful in simple projects for anything more complex or more production-ready it's not the best option. A good example of such an application is a demo app or something temporary.
The reason why it's not the recommended method:
- You can only have one service per port.
- You can only use ports 30000–32767.
- If your Node/VM IP address change, you need to deal with that.
Load Balancer
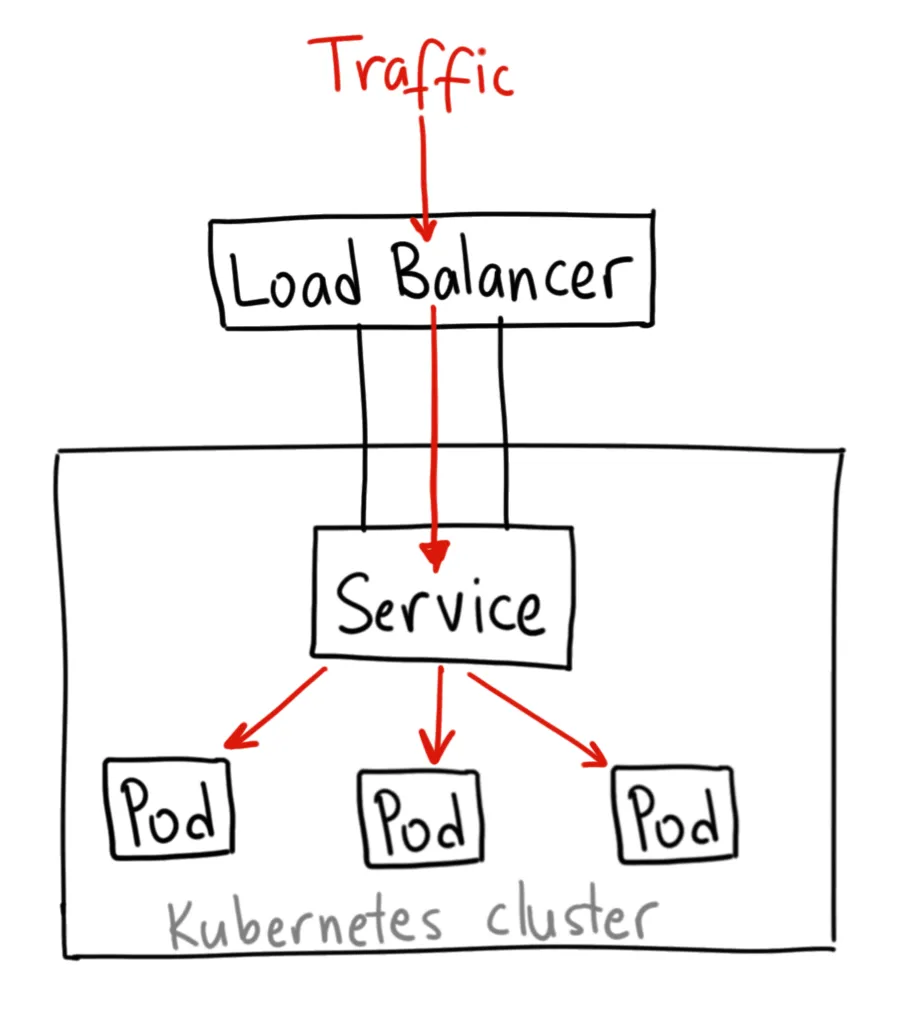
The next service we will talk about is the Load Balancer.
It is built on top of the NodePort service but provisions and configures external load balancers from third-party providers (such as AWS, GCP, or Azure).
The load balancer then routes the traffic to the corresponding NodePort service.
Implementation of load balancer service differs between cloud providers and things change fast in the cloud world so it would be best if you use the official documentation of the provider of your choice.
Where would you use this?
Using a load balancer is the default way of exposing external traffic to a service. There is no filtering, routing, or anything else which means you can send any kind of traffic into it such as HTTP, gRPC, WebSockets, etc...
The downsides of this approach include:
- Complexity – Configuring and managing the Load Balancer service may require additional knowledge and skills beyond basic Kubernetes usage.
- Cost – Depending on the cloud provider and type of Load Balancer used, there may be additional costs associated with using the Load Balancer service.
- Latency – The Load Balancer service may introduce additional latency to your application if traffic needs to be routed through multiple layers of infrastructure.
- Limited Features – The Load Balancer service may not provide all the features and capabilities of a dedicated load balancing solution, such as advanced traffic routing or health checks.
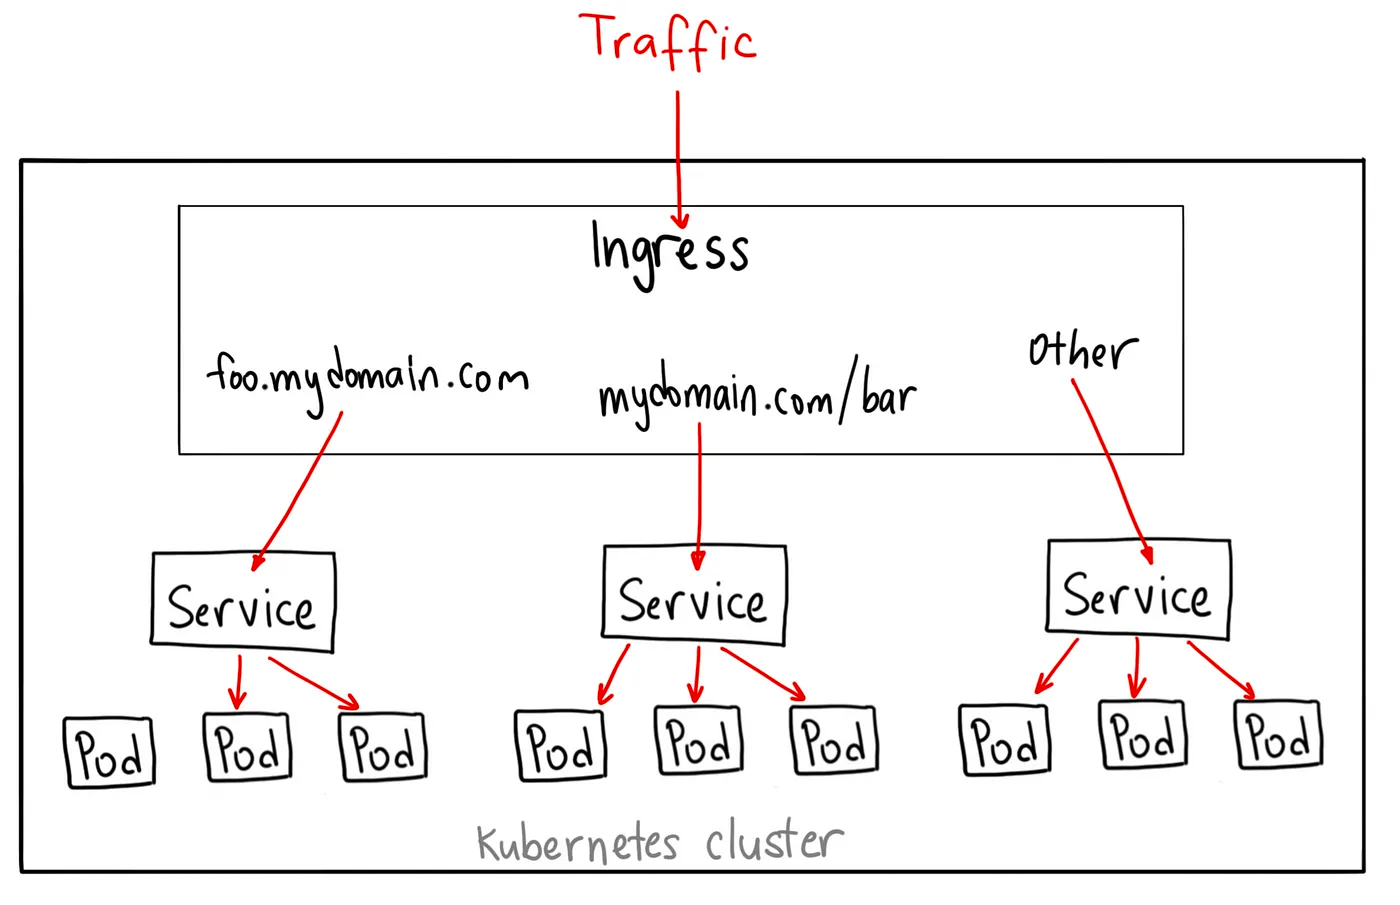
Ingress
Before we begin talking about Ingress and Ingress Controllers, we have to talk about the limitation of Load Balancers in Kubernetes.
- Lack of Flexibility – Load balancers work in layer 4 (transport layer) of the OSI model, meaning that the only thing they do is only distribute traffic based on IP addresses and ports. This makes it difficult to implement more advanced traffic routing and management rules.
- Limited scalability – Load balancers rely on network address translation (NAT) to distribute traffic, which can limit scalability and performance in high-traffic scenarios.
- Cost – Load balancers provided by cloud providers often come with a cost, which can add up quickly if you have multiple applications running.
This is why Ingress was created to tackle these issues.
Don't get me wrong, Ingress is NOT a Kubernetes service, it acts as a smart router behind your cluster or services.
If you want the technicalities, it's just a layer 7 (application layer) load balancer.
For example, let's define an ingress object using an NGINX as a layer 7 load balancer.
apiVersion: networking.k8s.io/v1
kind: Ingress
metadata:
  name: ingress-example
  annotations:
    nginx.ingress.kubernetes.io/rewrite-target: /
spec:
  ingressClassName: nginx-example
  rules:
  - http:
      paths:
      - path: /api
        pathType: Prefix
        backend:
          service:
            name: api-service
            port:
              number: 80
Where would you use this?
Ingress is the most powerful way to expose your services but albeit the most complicated.
There are many types of Ingress controllers from AWS ELB to Nginx and others. There are also many plugins for Ingress controllers. For example, cert-manager is a popular plugin that manages TLS certificates.
Ingress is best used when you want to:
- Ingress provides a single entry point to your cluster which means you can expose multiple services on the same IP address and port.
- Routing traffic based on domain name and URL path. So for example if you have a route for your backend named
/apiand a route for your frontend named/web.Ingress will allow you to route using one layer 7 load balancer to multiple different services. - Handling SSL/TLS connections. Ingress can terminate SSL/TLS connections and forward decrypted traffic to the appropriate service, allowing you to provide secure communication between your clients and services.
- Load balance multiple services using one router. This also makes it cost-effective because you're only paying for one load balancer.
- Implement advanced traffic routing. Ingress can implement advanced traffic routing strategies, such as canary releases, A/B testing, and blue-green deployments, allowing you to safely roll out new versions of your services without disrupting your users.
Conclusion
In conclusion, load balancing is a critical aspect of modern containerized applications that can help ensure optimal performance, scalability, and reliability.
With Kubernetes, load balancing is made easy through services such as ClusterIP, NodePort, LoadBalancer and Ingress (not a service but should be included).
But the best way to learn something is to not just read an article about it. I encourage everyone to experiment with the different methods mentioned in this article.
I hope this article has been informative and has provided you with valuable insights. I invite you to peruse my collection and discover more about the exciting world of [topic]. Thank you for reading, and I look forward to sharing more with you in the future!
I hope you learned something today. If you enjoyed reading it, you may want to explore some of my other articles, which cover related topics in greater depth.
Thanks for reading.
No spam, no sharing to third party. Only you and me.
Member discussion