Message Queues with Celery, Redis, and Django
Some tasks don't have to be done immediately.
Examples of tasks like these include:
- When a user signs up, you don't need to immediately send emails to him.
- When a video gets uploaded to YouTube, thumbnails get generated after some time.
- When you want to generate reports on AWS, it will take up to a day for them to get generated.
There are lots of these kinds of examples on the web.
But how do they work exactly?
It's similar to how real-life restaurants work.
Let's break it down, in a restaurant:
- You go to a restaurant
- You make an order
- You get a queue
- You are told to wait
- Once the chefs are free, they make your order
- Once the order is done, you receive it
This sounds too simple, but it works similarly with computers.
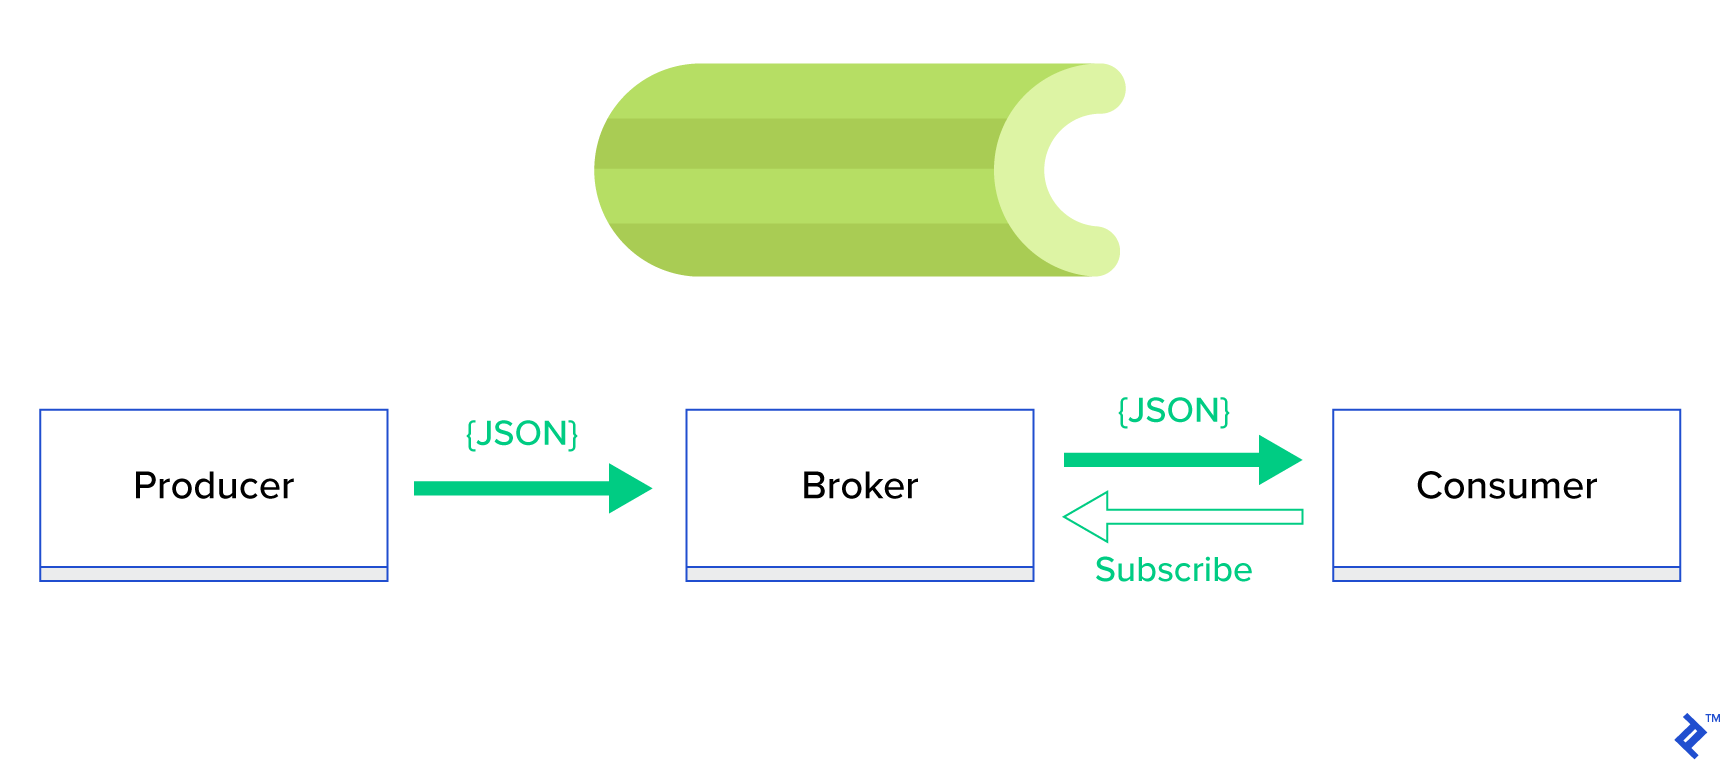
There are two main components to make this work:
- Message Queues – This is where pending jobs reside. They simply wait till it's their turn to be processed.
- Workers – Processes that can take jobs (data) from the message queue and process them.
It's as simple as that, you send a job to a message queue and once a worker is free, it will process the job.
A popular stack to do this in Python/Django is using Celery and Redis.
Let's briefly go over them.
Celery
Celery is an open-source distributed task queue, meaning that you can have workers in different locations that all answer to one message queue.
Some people might be confused about why we use other message queues with Celery. It's because Celery is more of a high-level abstraction of message queues. For example, you can use different message queues such as Kafka, RabbitMQ, or Redis and still use the same code in Celery. It abstracts the complexity in managing message queues directly.
Another interesting fact is that Celery process tasks in multiple worker nodes using multiprocessing, eventlet or gevent.
Celery is also very popular and is used in production systems. One of them, you may know as Instagram.
Redis
As explained above, we need a message queue to work with Celery.
For our tutorial today, we will use Redis.
Some people know Redis as a caching service, but that's not the only thing it provides.
Redis has many different use-cases from caching to machine learning. One of its use-cases is to act as a message queue.
I won't go into too much detail because I already have a comprehensive article about Redis that you can check out here.
 Tamerlan Gudabayev
Now that all the theory is done, let's create a simple task in Django with Celery and Redis.
Prerequisites
- Python3
- Docker and Docker-Compose
- Basic knowledge of Python, Django, and Containerization
Initializing our Django Project
If you already have a Django project setup, you can skip this step.
If not follow along. Begin with creating a new directory.
mkdir django-celery-demo
cd django-celery-demo/
Create our virtual environment and install Django:
python3 -m venv venv
source venv/bin/activate
pip install django
Start our Django Project called core and create our first app called "app":
django-admin startproject core .
python manage.py startapp app
We also need to install Redis and Celery dependencies:
pip install celery
pip install redis
Don't forget to have a requirements.txt with all the dependencies needed for the project.
pip freeze > requirements.txtDockerizing our App
Create a Dockerfile with the following code:
FROM python:3
ENV PYTHONUNBUFFERED=1
WORKDIR /usr/src/app
COPY requirements.txt ./
RUN pip install -r requirements.txt
We simply describe what kind of container we want and configure it to our needs. What this Dockerfile does is simply initialize a python3 container, set our work directory as /user/src/app and install all dependencies coming from requirements.txt.
We don't only need one container, we actually need 3 of them.
- The first container will be our Django app, which will use our Dockerfile and run the command
python manage.py runserver 0.0.0.0:8000 - Our second container will be our celery worker, which will listen to tasks in our message queue and process them. This container will use our Dockerfile with the command
celery -A core worker -l INFOto run the workers. - Our third container will be our Redis service that will default to port 6379.
Anyways, create a docker-compose.yml file with the following:
version: "3.8"

services:
    django:
        build: .
        container_name: django
        command: python manage.py runserver 0.0.0.0:8000
        volumes:
            - .:/usr/src/app/
        ports:
            - "8000:8000"
        environment:
            - DEBUG=1
            - DJANGO_ALLOWED_HOSTS=localhost 127.0.0.1 [::1]
            - CELERY_BROKER=redis://redis:6379/0
        depends_on:
            - pgdb
            - redis
    celery:
        build: .
        command: celery -A core worker -l INFO
        volumes:
            - .:/usr/src/app
        environment:
            - DEBUG=1
            - DJANGO_ALLOWED_HOSTS=localhost 127.0.0.1 [::1]
            - CELERY_BROKER=redis://redis:6379/0
        depends_on:
            - django
            - redis
    redis:
        image: "redis:alpine"
I also added some environment variables such as CELERY_BROKER to refer to later in our app.
If you run the docker-compose file with:
docker-compose up All containers would work except the celery because we haven't configured it yet in our app.
Let's move to that.
Installing and Configuring Celery
To configure celery we first need to initialize it, to do that in our core folder create a celery.py file with the following:
# core/celery.py
from __future__ import absolute_import, unicode_literals

import os

from celery import Celery

os.environ.setdefault("DJANGO_SETTINGS_MODULE", "core.settings")

app = Celery("core")

app.config_from_object("django.conf:settings", namespace="CELERY")

app.autodiscover_tasks()
Here we state that we want to use absolute imports instead of relative ones. You can read more about the difference here.

We then set the default Django settings module for the program to be our core.settings file.
Here's the interesting part, we initialize Celery with the name "core" and tell it to read from our settings.py for any configurations but we also include a namespace CELERY meaning that all celery related configs MUST begin with CELERY.
For example, BROKER_URL becomes CELERY_BROKER_URL
Let's use this moment to also add our configs into our settings.py file:
# settings.py

CELERY_BROKER_URL = os.environ.get("CELERY_BROKER", "redis://redis:6379/0")
Going back to our celery.py file, in the last line of code, we tell Celery to automatically find tasks in other applications.
Keep in mind that this will work only if your tasks are located in tasks.py file.
If you want to use some other file name, you can do it this way:
app.autodiscover_tasks(related_name='some_other_name')
Finally, to make this all work, we have to import it to our core/__init__.py file:
# core/__init__.py

from .celery import app as celery_app


__all__ = ("celery_app",)
Now if you run the containers again, you would see everything working. But we can't test it because we don't have any tasks. So let's work on that next.
Creating our Sample Task
Our task will be simple. It's a simple addition function that takes in two numbers and returns the sum.
Don't forget we have to add this function to our tasks.py file in our app.
So in our app folder, create a tasks.py file with the following:
from __future__ import absolute_import, unicode_literals

from celery import shared_task

@shared_task
def add(x, y):
    return x + y
We use the shared_task decorator to tell Celery that this is a reusable task meaning that the task can be configured by third-party users. If you're not building a reusable task then use the app.task decorator.
Once you have that done, don't forget to add our app to settings.py
# core/settings.py
# Application definition

INSTALLED_APPS = [
    'django.contrib.admin',
    'django.contrib.auth',
    'django.contrib.contenttypes',
    'django.contrib.sessions',
    'django.contrib.messages',
    'django.contrib.staticfiles',
    'app',
]
Running our Tasks
To run our tasks, we first have to run our containers.
To run all the containers, run the command:
docker-compose up If everything worked you should the logs of our services.
Now that we have everything running, let's run our add task.
In another terminal run the following command to enter the python shell inside our Django container.
docker-compose exec django bash
python manage.py shell
Once you have the shell running, import our task and run it with the delay method which means that I don't need the result immediately just add it to the queue and process it when possible.
from app.tasks import add
add.delay(2,3)
You would get an AsyncResult which basically means that your task has successfully been added to the queue and you can use this object to check on it's state.
<AsyncResult: 72cb8b5c-3e5b-4ceb-bc44-8734833d8753>To see our worker in action, we can see the results of the method in our logs:
django-celery-celery-1 | [2021-12-01 13:31:26,975: INFO/ForkPoolWorker-4] Task app.tasks.add[72cb8b5c-3e5b-4ceb-bc44-8734833d8753] succeeded in 0.004156041999522131s: 5We just run our first task successfully. To get the results back, you can use the .get() method on the AsyncResult object.
This is just the beginning, you can explore more about the different ways to call tasks here.

Conclusion
Now you have an extra weapon in your programming arsenal. But don't overdo it, tasks add complexity and having lots of them in your project is a bad idea.
Just know that everything has its use-case and it's our job as software engineers to know when to use what tool.
Thanks for reading!
No spam, no sharing to third party. Only you and me.
Member discussion