Setting Up Copilot in Neovim with Sane Settings
I've been using Copilot with Neovim for quite some time.
However, integrating this tool effectively wasn't a straightforward task. After several iterations, I've honed configurations that harmonize with my coding style.
In this guide, I'll share insights on installing and configuring GitHub Copilot within Neovim, specifically using zbirenbaum/copilot.lua, a Lua-based alternative to the official plugin.
PS. This walkthrough assumes you already possess a GitHub Copilot subscription.
Installing Copilot in Neovim
To install Copilot, I suggest using the zbirenbaum/copilot.lua plugin. I know this isn't the official plugin for Copilot but I prefer this one because:
- 100% written in Lua and it works with my configuration much better.
- It has integrations with CMP, which I prefer to use over virtual text.
If you're not convinced, here's an excerpt from the author of copilot.lua on why he created it:
While using copilot.vim, for the first time since I started using neovim my laptop began to overheat. Additionally, I found the large chunks of ghost text moving around my code, and interfering with my existing cmp ghost text disturbing. As lua is far more efficient and makes things easier to integrate with modern plugins, this repository was created.Copilot Lua is very simple to install. Just use whatever plugin manager you have. I use Lazy, so installing it just means adding it to my plugins list.
As recommended by the plugin author, it's best to lazy load the plugin because the Copilot server takes some time to start.
{
  // Rest of your configuration
  {
      "zbirenbaum/copilot.lua",
      cmd = "Copilot",
      event = "InsertEnter",
  },
}
Installing copilit.lua with Lazy
Save the file and reload Neovim.
The plugin should be installed with the default configurations and the next thing you have to do is authenticate to Copilot using the :Copilot auth command.
At this point, you should have Copilot running and ready to use. But if you're not a fan of Copilot polluting your screen like me then I'd suggest moving it to the same place where your completion list.
If you're confused, then it essentially looks something like this:
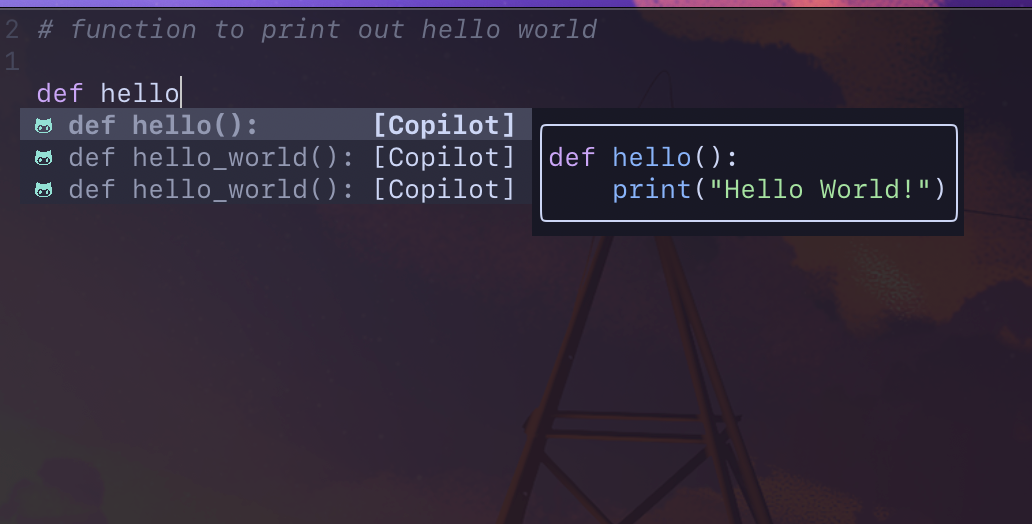
Copilot CMP
To implement this you must first have nvim-cmp installed and configured.
Then the only thing you have to do next is to install copilot-cmp.
{
  // Rest of your Plugins
  {
      "zbirenbaum/copilot-cmp",
      config = function()
          require("copilot_cmp").setup()
      end,
  },
}
Installing copilot-cmp with Lazy
Once you have that installed, you have to configure CMP to work with copilot_cmp. To do that, in your cmp configurations, you have to add copilot as one of your sources.
cmp.setup {
  ...
  sources = {
    -- Copilot Source
    { name = "copilot", group_index = 2 },
    -- Other Sources
    { name = "nvim_lsp", group_index = 2 },
    { name = "path", group_index = 2 },
    { name = "luasnip", group_index = 2 },
  },
  ...
}
I also like to have an icon indicating that a suggestion is from Copilot. You can do that by configuring the cmp symbol map.
-- cmp.lua
cmp.setup {
...
formatting = {
format = lspkind.cmp_format({
mode = "symbol",
max_width = 50,
symbol_map = { Copilot = "" }
})
}
...
}It is also recommended to disable copilot.lua suggestions and panel modules, as they can interfere with completions properly appearing in copilot-cmp. To do so, simply place the following in your copilot.lua config:
require("copilot").setup({
  suggestion = { enabled = false },
  panel = { enabled = false },
})
These have been my configurations. If you have any problems then feel free to check out my full configuration files:
Thanks for reading.
No spam, no sharing to third party. Only you and me.
Member discussion